Introduction
In today's online world, keeping your information safe is really important. There are a lot of online threats out there, so it's vital to protect your data and systems. AWS Verified Access is a tool that helps with this. It gives you a secure way to control who can get into your AWS resources. This is good news for businesses big and small because it means they can be more confident about their security.
In this article, we'll discuss the fundamentals of AWS verified access and explore its configuration through examples.
Steps to be covered:
- Introduction
- What is AWS Verified Access?
- How Verified Access works?
- How to use AWS Verified Access with Okta?
What is AWS Verified Access?
With AWS Verified Access, you can let people safely use your apps without needing a VPN (a secure connection). It checks every request to use an app and makes sure that people can only get in if they meet certain security rules.
AWS Verified Access boosts security by checking every app access request in real time, making it tough for unauthorized access. It links with AWS and other security services to check if users and devices are safe before letting them in.
This method also cuts down on the need for VPNs, leading to fewer technical problems and easier access for users.
How Verified Access works?
AWS Verified Access checks each time a user wants to use an app, deciding if they can get in based on two things: information from a trusted security service you pick (either from AWS or another company) and rules you make.
When someone tries to use an app, Verified Access looks at their info from the security service and sees if it matches your rules. Users can only use the app if they meet your security needs. By default, nobody gets in until you set up these rules.
Also, Verified Access keeps track of every time someone tries to access an app, making it easier for you to handle any security problems or check who's been trying to get in.
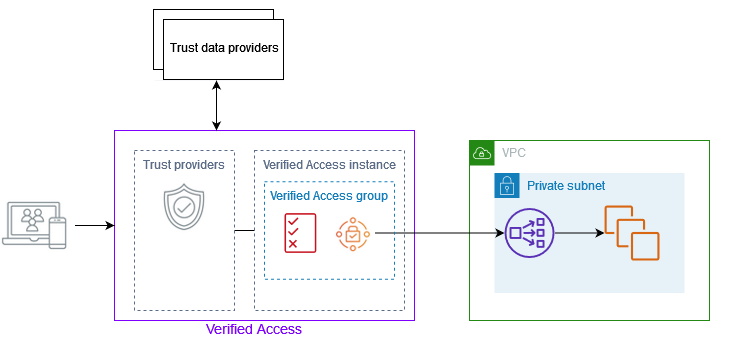
Verified Access Partners
Verified Access Partners refers to a group of selected providers that AWS Verified Access has teamed up with. These partnerships make setting things up simpler because they work seamlessly with AWS Verified Access. This means businesses can get everything up and running quickly and without hassle.
Trust/networks providers
Trust/Network Providers are entities that facilitate secure transactions and communications over the internet. They act as middlemen, checking identities, ensuring data is secure, and building trust in online interactions. These providers are essential for safe and dependable digital transactions, boosting confidence for users and businesses.
SIEM/observability providers
SIEM (Security Information and Event Management)/observability providers are platforms or services that offer comprehensive monitoring and analysis capabilities for cybersecurity and system performance. They collect, correlate, and analyze data from various sources to detect and respond to security threats or operational issues in real-time.
These providers enable organizations to enhance their security posture, improve compliance, and optimize system performance through actionable insights derived from data analysis.
AWS Verified Access DSM specifications
When setting up the AWS Verified Access DSM, having a good grasp of its specifications can ensure a smooth integration. For instance, being aware of the supported protocols beforehand can minimize any challenges during the configuration process.
Below is a table outlining the specifications for the AWS Verified Access DSM:
| Specification | Value |
|---|---|
| Manufacturer | Amazon |
| DSM | AWS Verified Access |
| RPM name | DSM-AWSVerifiedAccess-QRadar_version-Build_number.noarch.rpm |
| Supported protocols | Amazon AWS S3 REST API & Syslog |
| Event format | JSON |
| Automatically discovered? | Yes |
| Includes identity? | Yes |
| Includes custom properties? | Yes |
| More information | AWS website |
How to use AWS Verified Access with Okta?
We'll demonstrate Okta configuration in six steps.
Prerequisites
- An AWS account
- An Okta account
- An instance running webserver
- Public Domain with TSL/SSL certificate
Step 1: Configure OIDC application in Okta
I begin by creating a user and a group that we'll use to try out getting into AVA.
- After you sign in to Okta, click on
Directory, thenGroups, and chooseAdd Groupfrom the menu on the left. Type in a name for the group and save it. Remember the name of this group because you'll use it later when setting up the rules for getting in. Let's call this groupMarketing Teamfor our example.
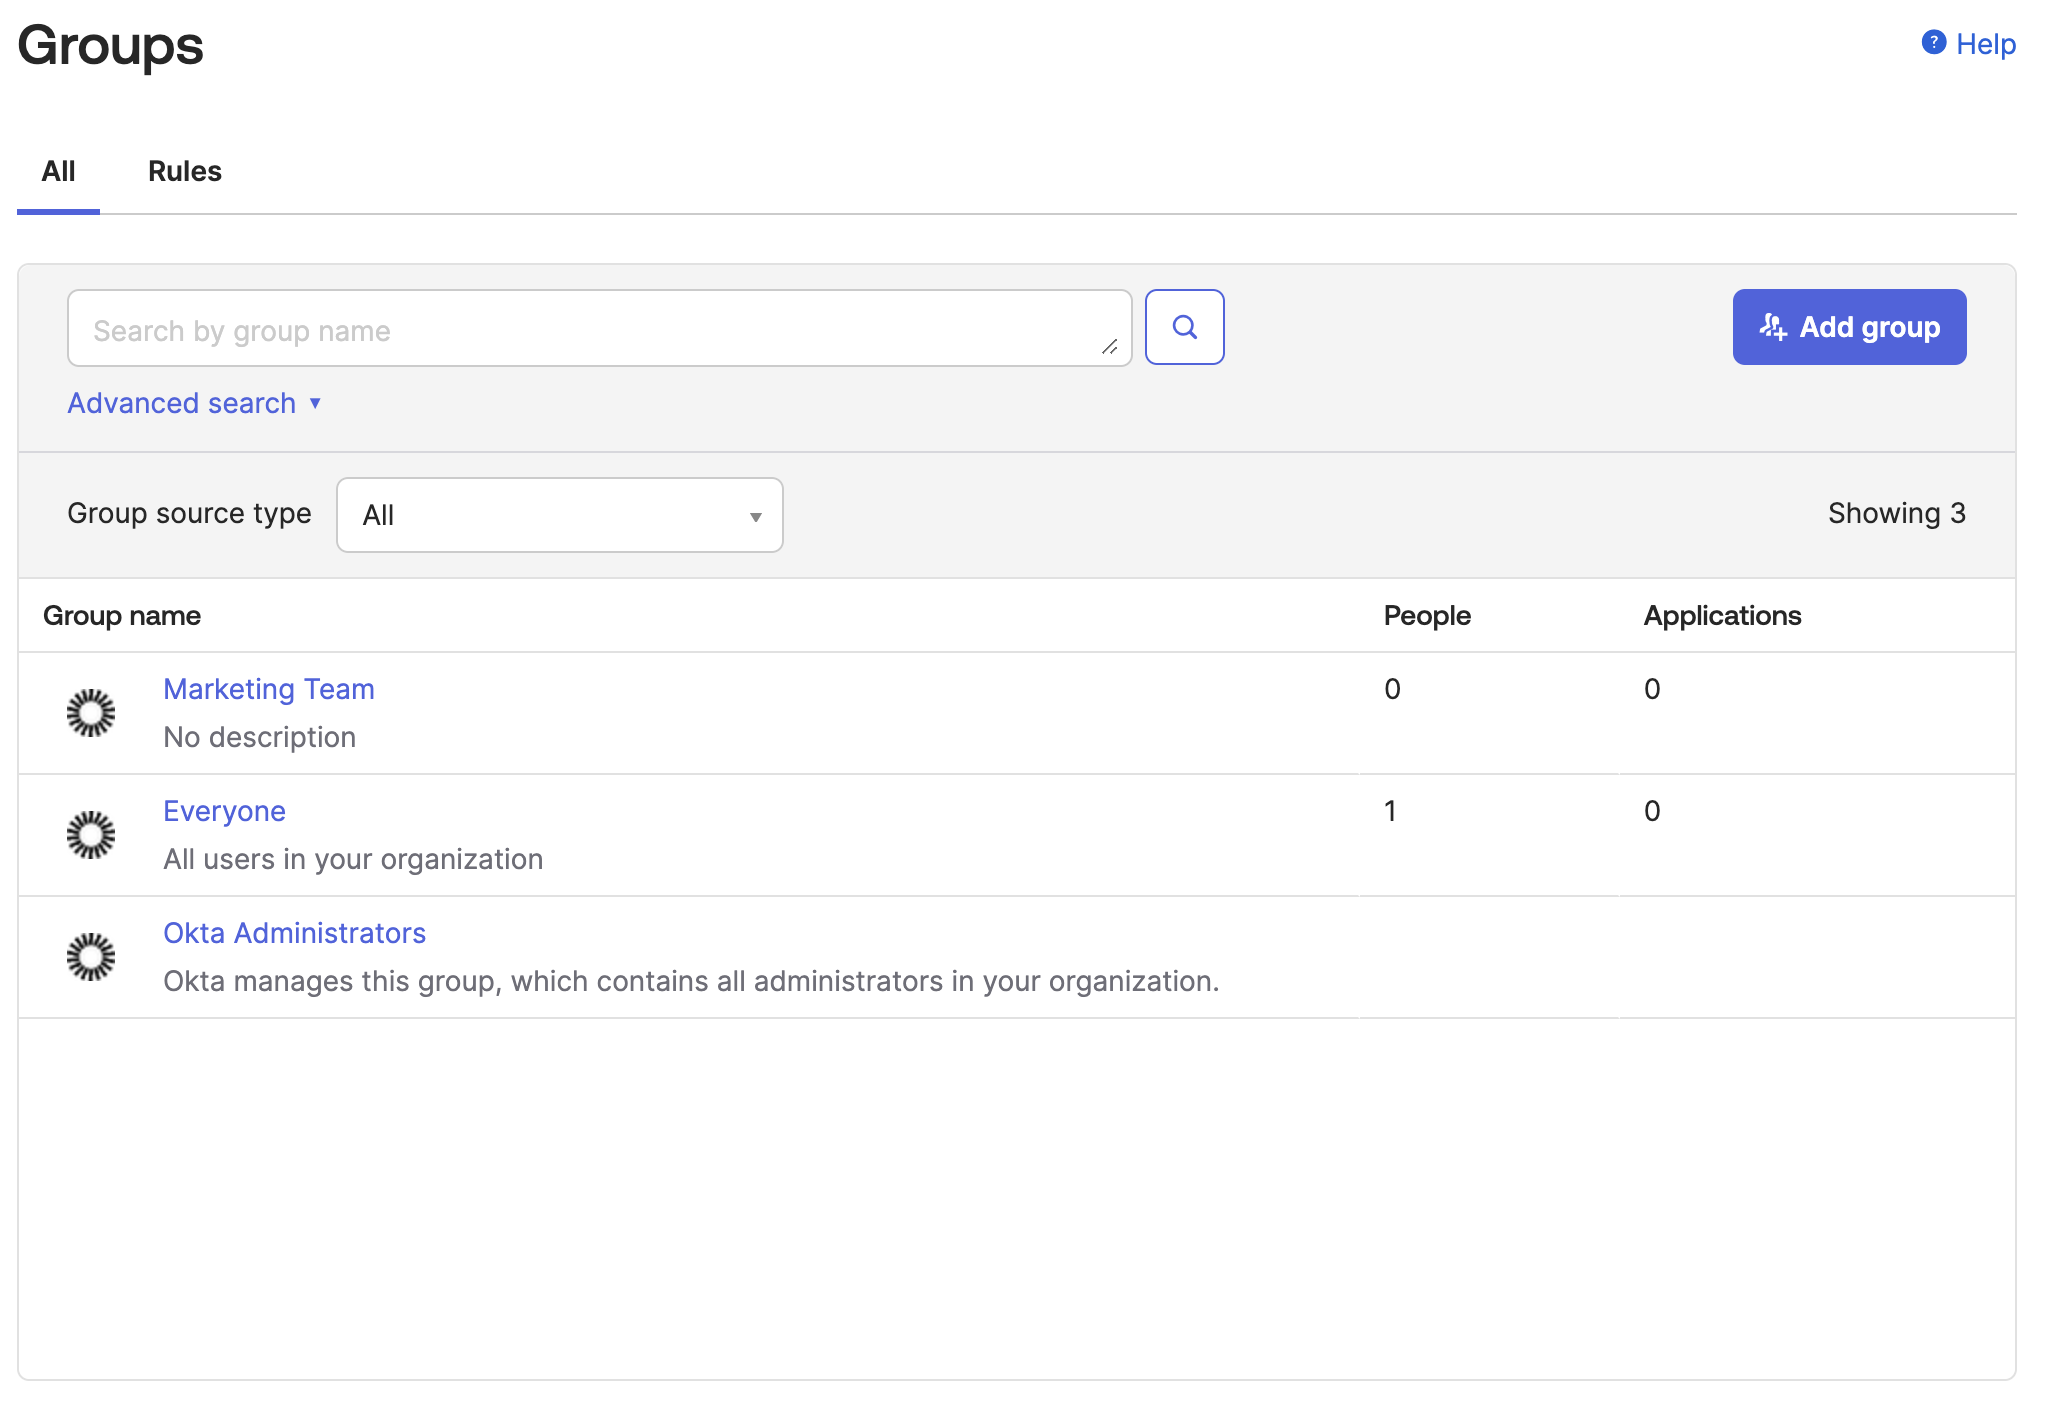
- Assign yourself/users to this group
Step 2: Create an OIDC application in Okta
To link AVA with Okta, you need to add it as an OIDC app. Here's how:
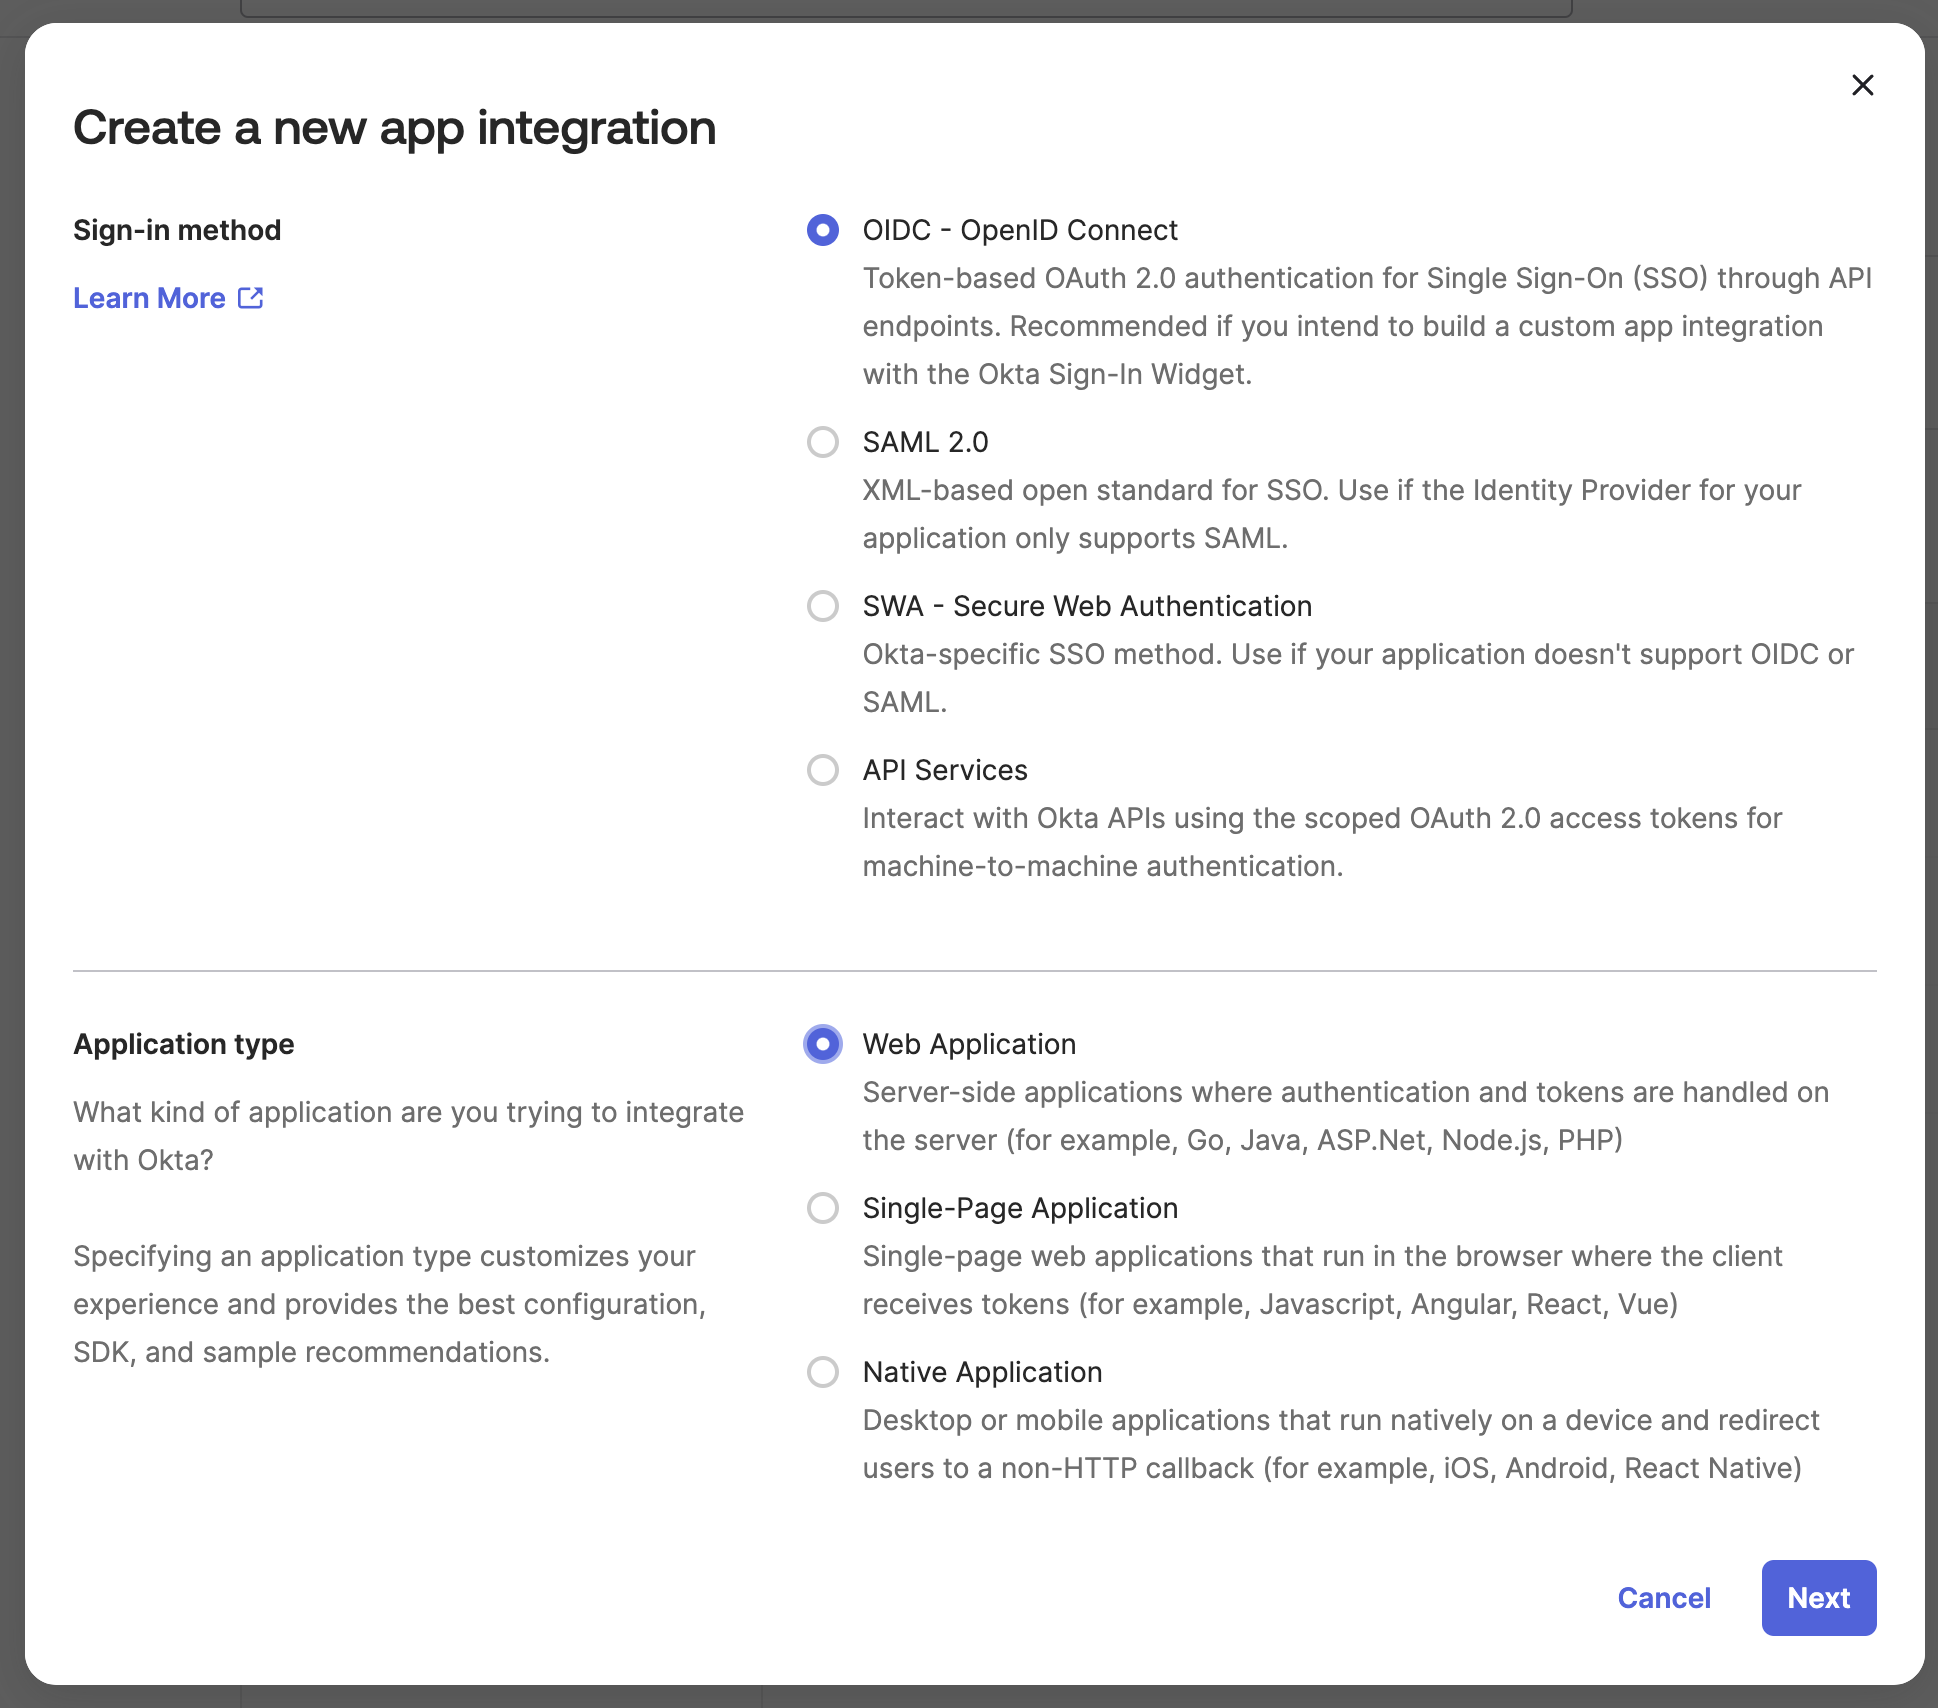
- Click on
Applicationsin the menu on the left side. - Choose
Create App Integration. - For the sign-in method, pick
OIDC - OpenID Connect. - For the application type, choose
Web Application. - Name your app integration
CI Cube App. - For sign-in redirect URIs, put in
https://cicube.aws.dev/oauth2/idpresponse. - Under assignments, choose
Controlled accessto let everyone in your company use it. If you want, you can limit it to certain groups by pickingLimit access to selected groupsand typing in the group name.
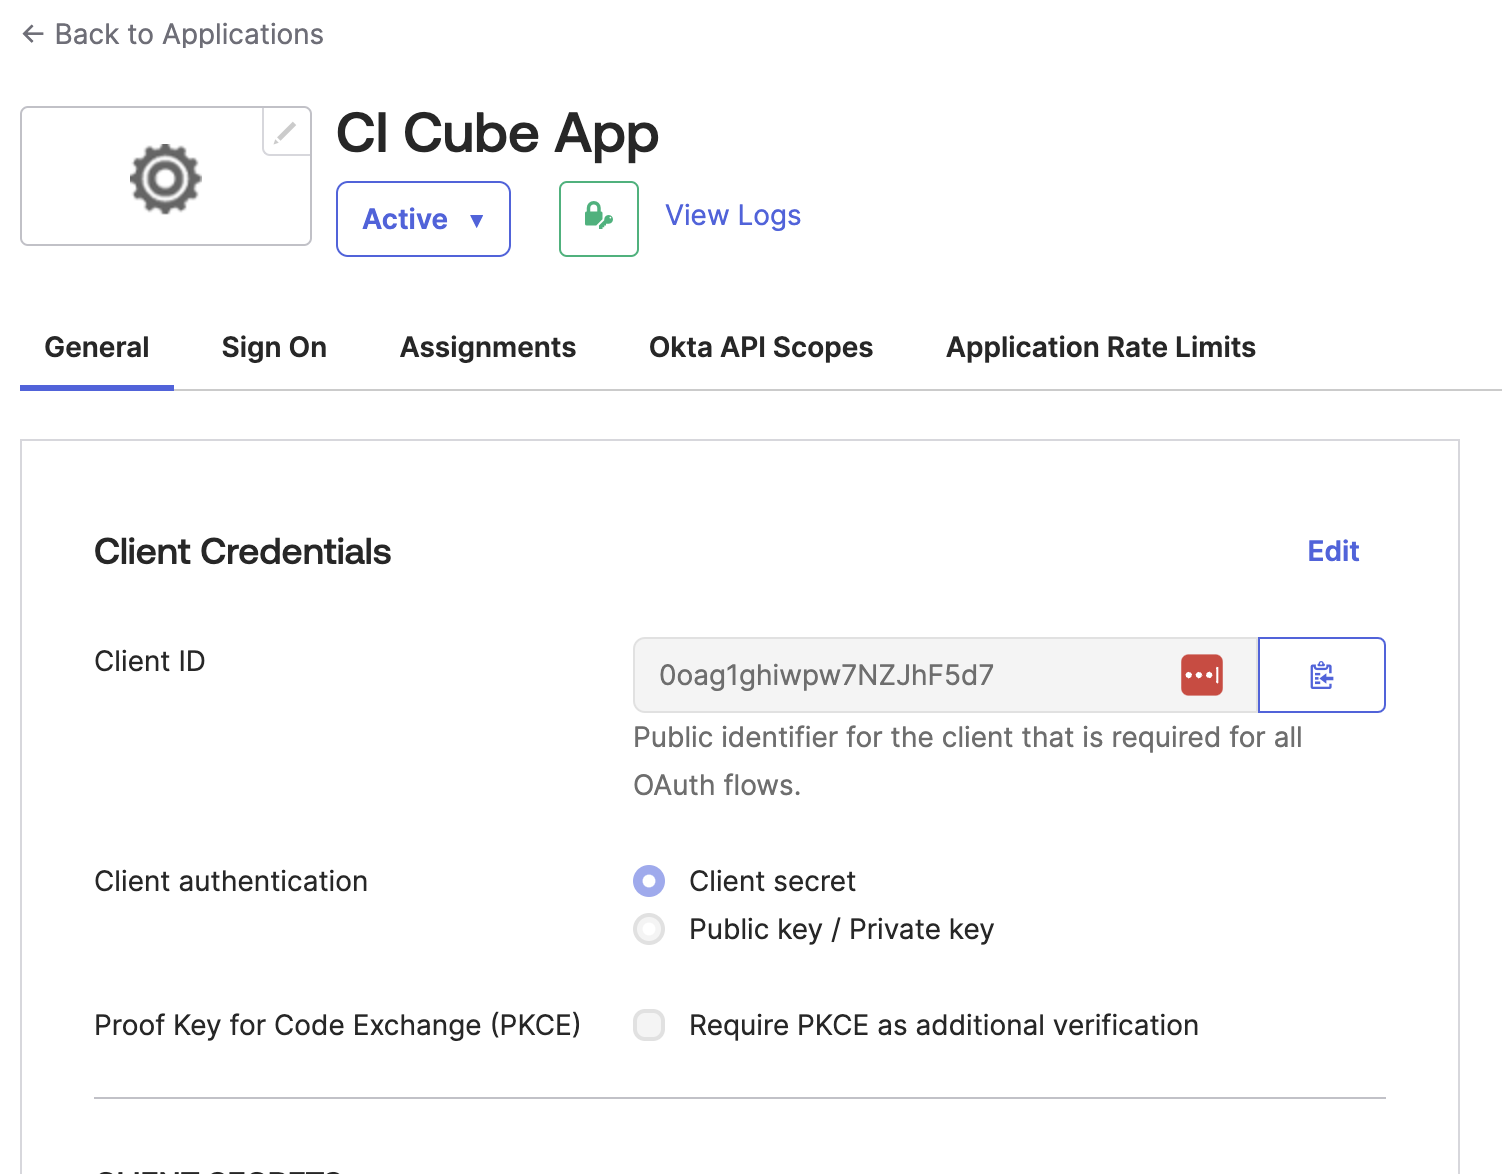
After you make the application:
- Copy the Client ID and Client Secret because you'll need them later for Verified Access.
- Click on
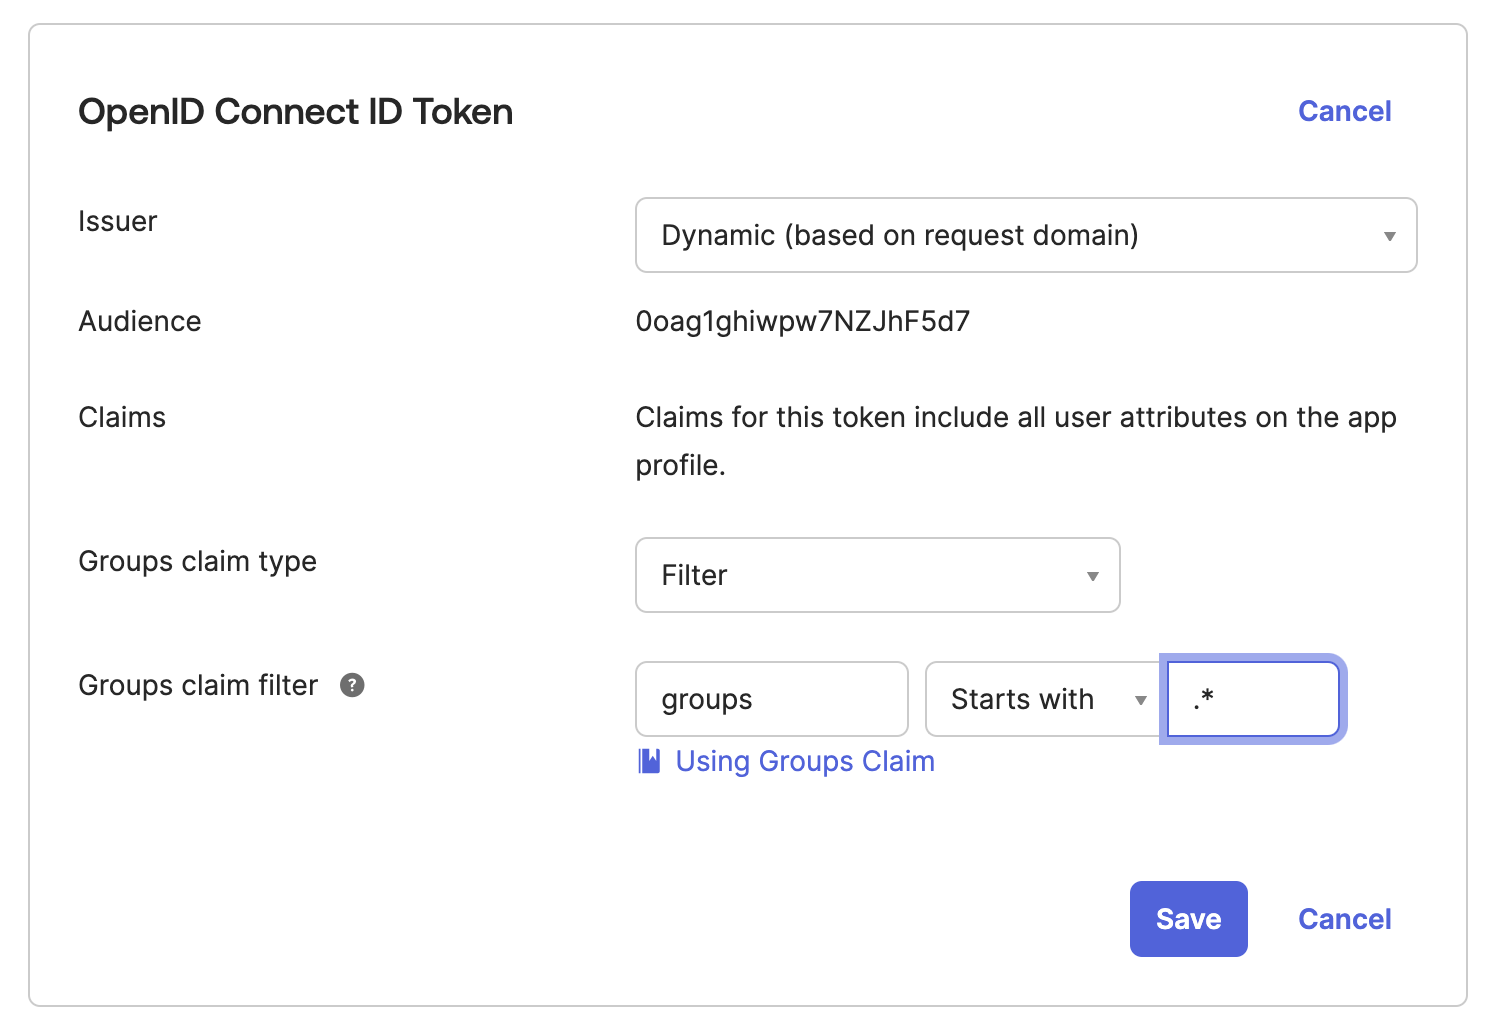
Application, findCI Cube App, and go toSign On. Look for theGroups claim filter, pickmatches regex, and type in.*. This tells it to send back all the user groups when someone signs in. Check the Okta help guide for more on group claims.
Step 3: Set up Verified Access in AWS
Setting up Verified Access involves four main steps:
- Set up a Trust Provider.
- Make an Access Instance.
- Form an Access Group.
- Establish an Access Endpoint.
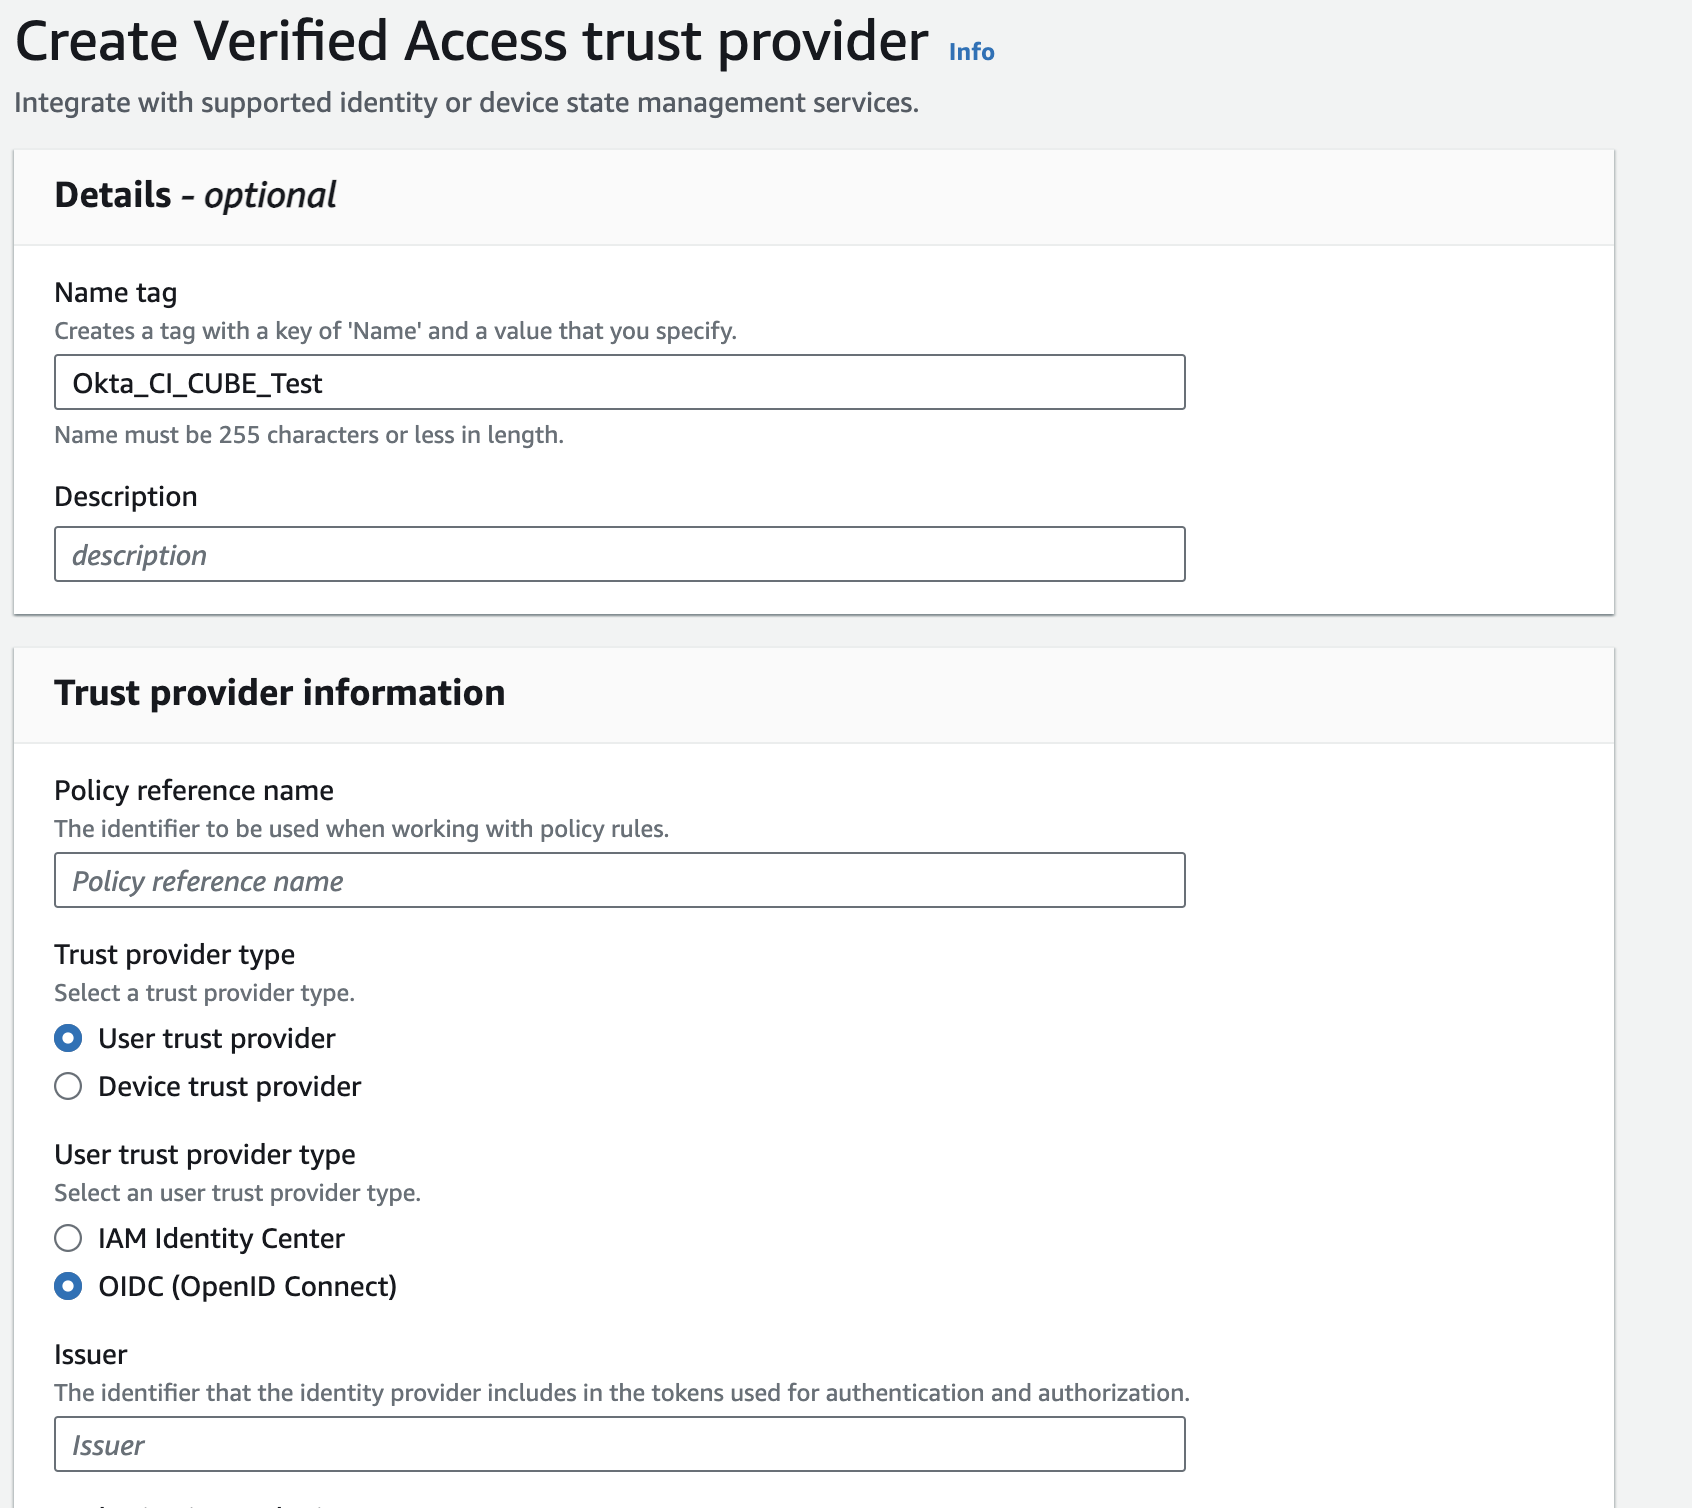
- Go to the VPC page and choose
Verified Access trust providerfrom the menu on the left. - For the policy reference name, type in a name you'll use later for policy rules. Let's use
Okta_CI_CUBE_Testfor our example. - Choose
User trust providerfor the trust provider type. - Pick
OIDC (OpenID Connect)as the user trust provider type.
For the next parts, you'll need info from Okta's OpenID Connect & OAuth 2.0 API. Go there and look for /.well-known/openid-configuration. Make a GET call as instructed, and be sure to replace ${YOUR_OKTA_DOMAIN} with your actual Okta sign-in URL.
GET https://${YOUR_OKTA_DOMAIN}/.well-known/openid-configuration
For instance, type this into your web browser's address bar:
https://dev-00000000-admin.okta.com/.well-known/openid-configuration
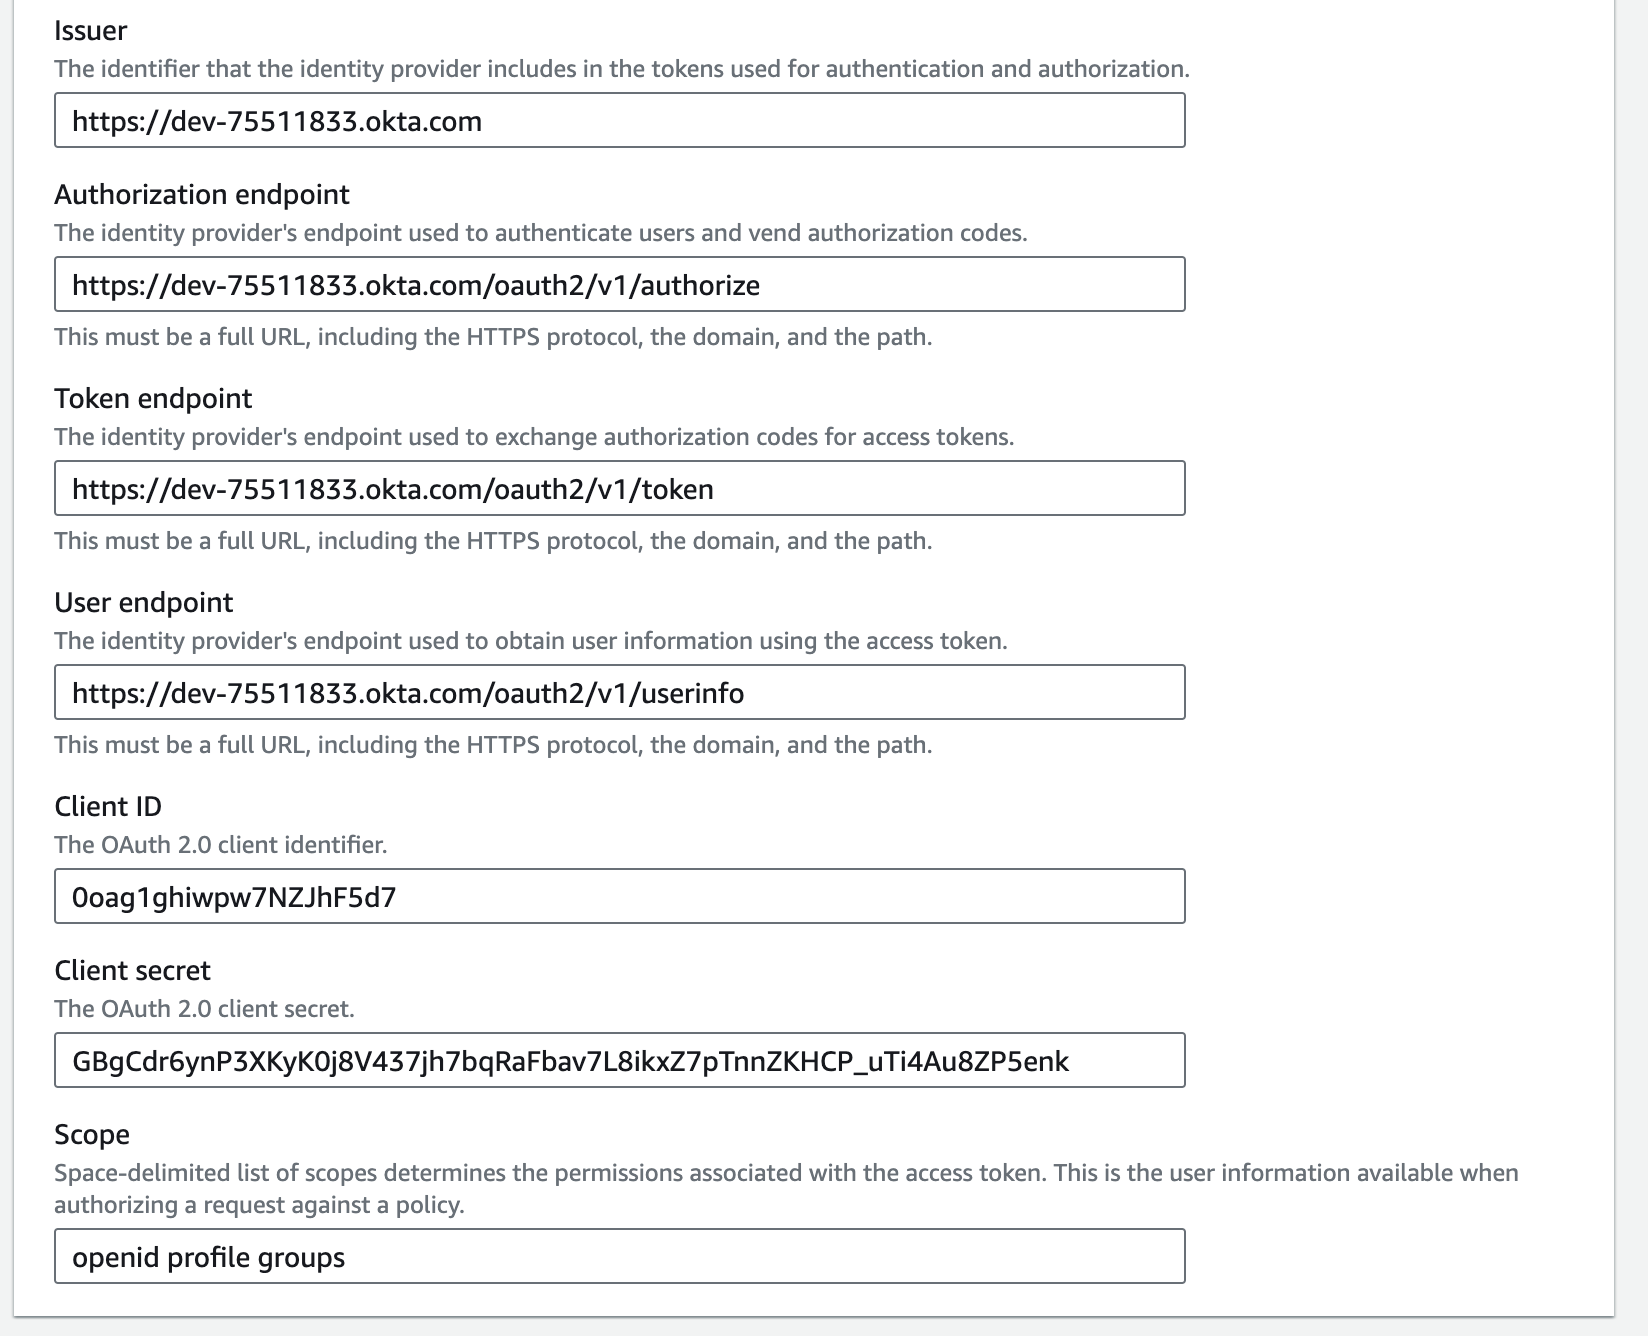
This will show you details like the issuer, authorization endpoint, token endpoint, and userinfo endpoint.
- Issuer: Type in your Okta login URL, for example,
https://dev-00000000.okta.com. - Authorization endpoint: Use your login URL followed by /oauth2/v1/authorize, like
https://dev-00000000.okta.com/oauth2/v1/authorize. - Token endpoint: Add /oauth2/v1/token to your login URL, making it
https://dev-00000000.okta.com/oauth2/v1/token. - User endpoint: This is your login URL plus /oauth2/v1/userinfo, such as
https://dev-00000000.okta.com/oauth2/v1/userinfo. - Client ID and Client Secret: Find these in your Okta app under
Applications, thenCI Cube App, and look inGeneral. - Scope: Type
openid profile groups. Including these scopes lets AVA access various user details for making decisions on who gets in.
Step 4: Set up an Access Instance
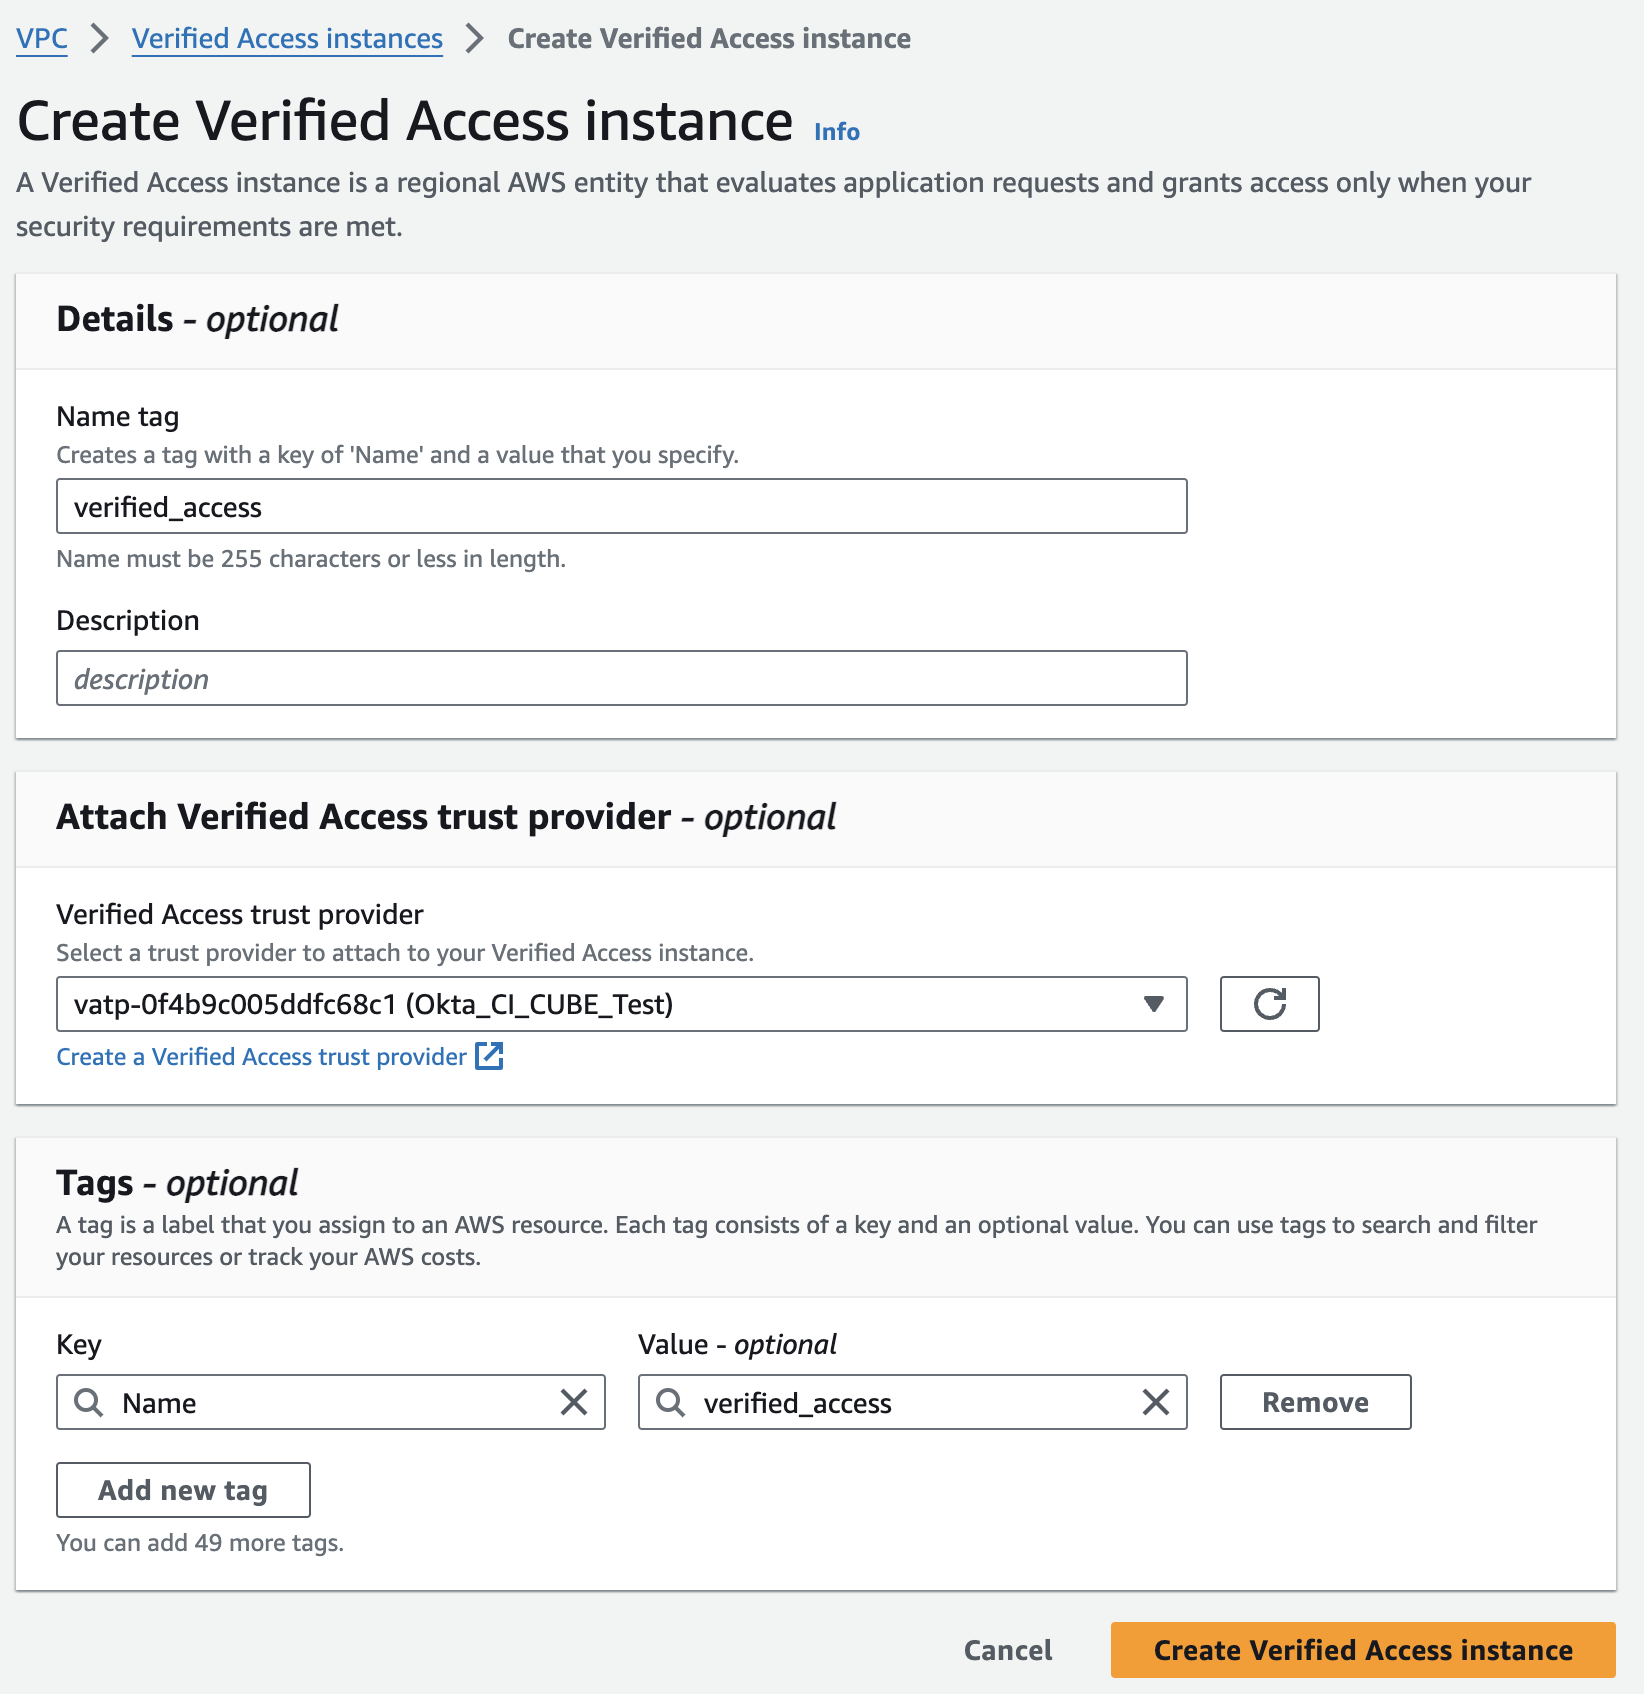
To make a Verified Access Instance, follow these steps:
- Fill in any optional details like a Name tag and description.
- Under Verified Access trust provider, choose the trust provider you set up before.
Step 5: Set up an Access Group
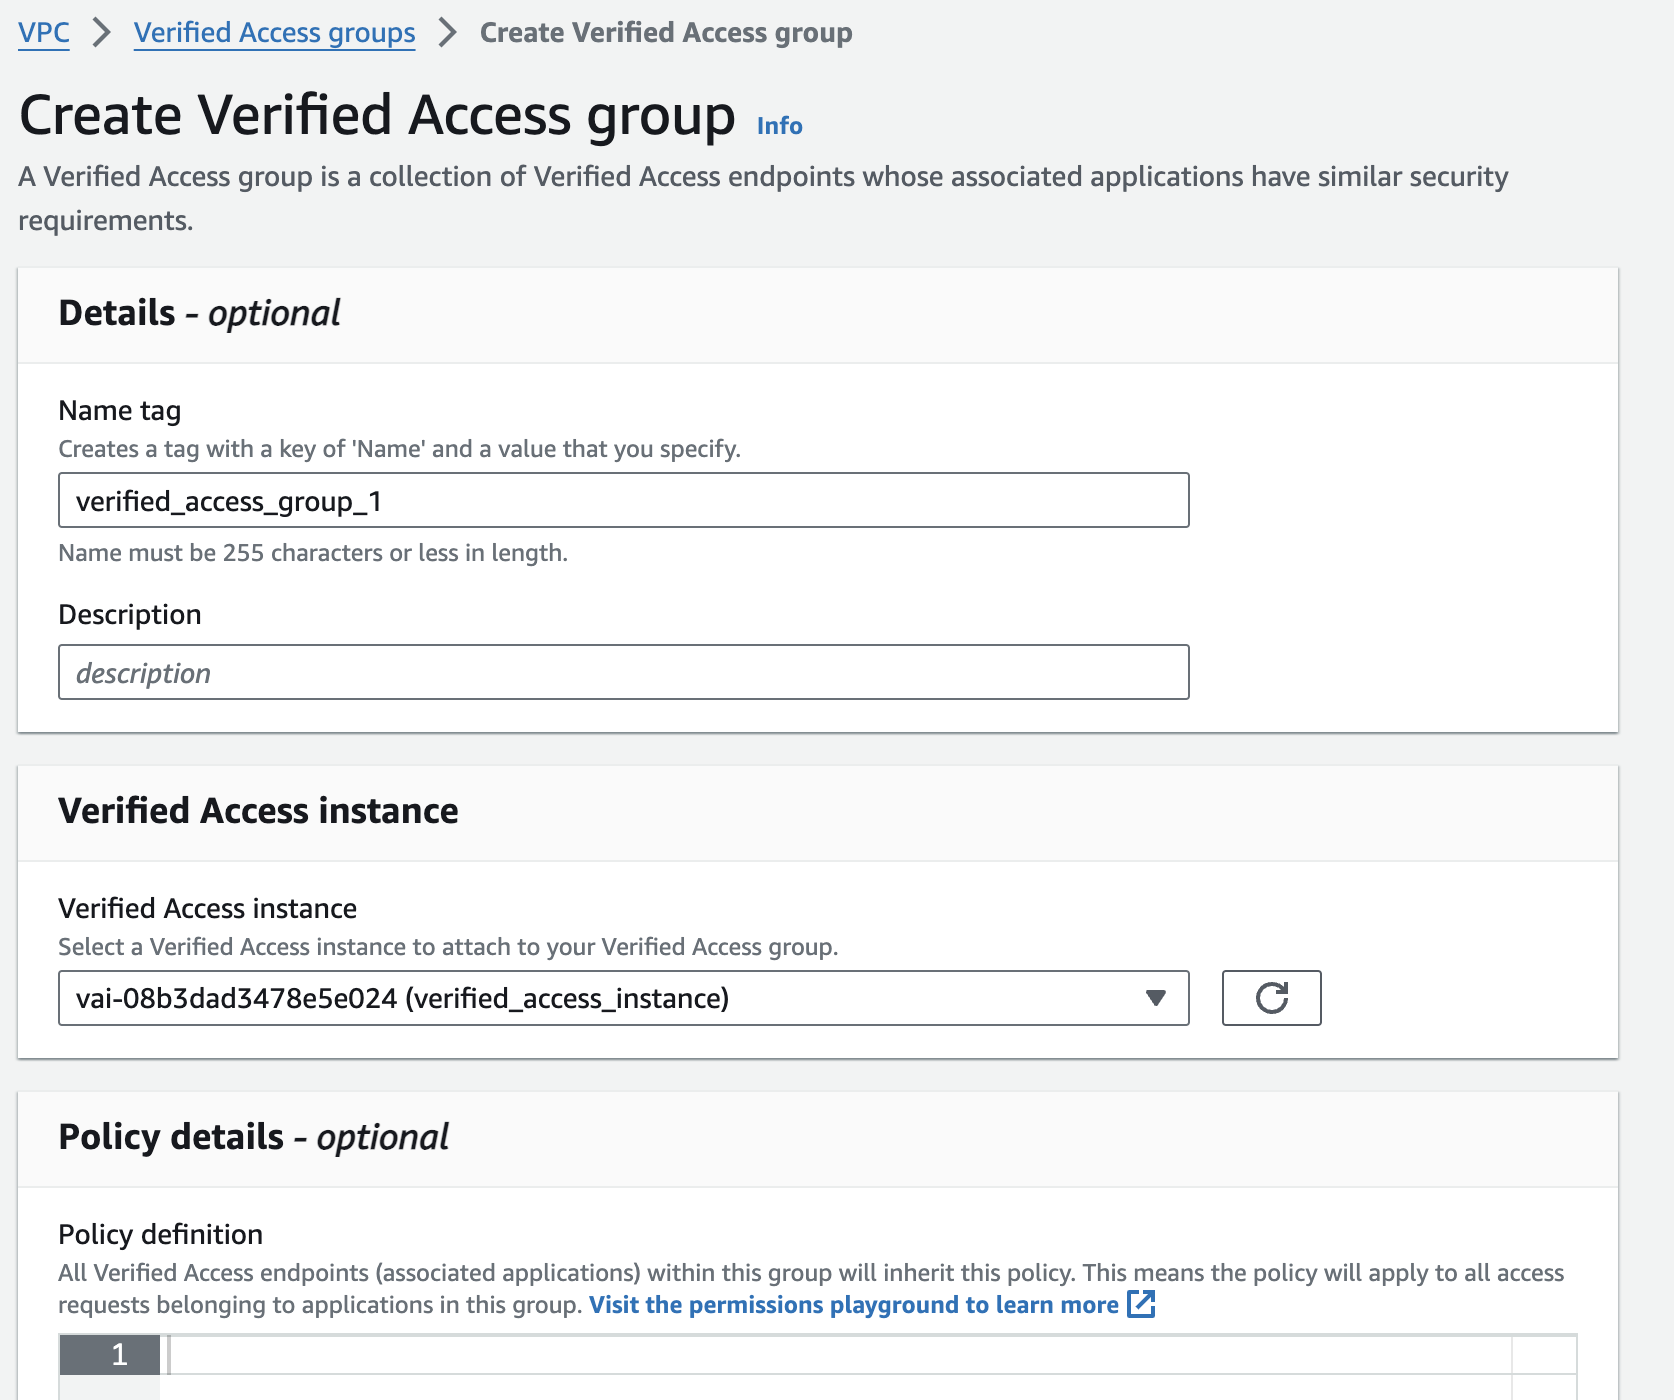
To set up a Verified Access Group, do this:
- Enter optional details like a Name tag and description.
- Choose the Verified Access Instance you made before, under Verified Access Instance.
- We'll make the policy later on.
Before you set up an endpoint, you need to get a TLS certificate from AWS Certificate Manager first. Make sure the certificate's domain name matches the public domain name that your users will type in to get to your application.
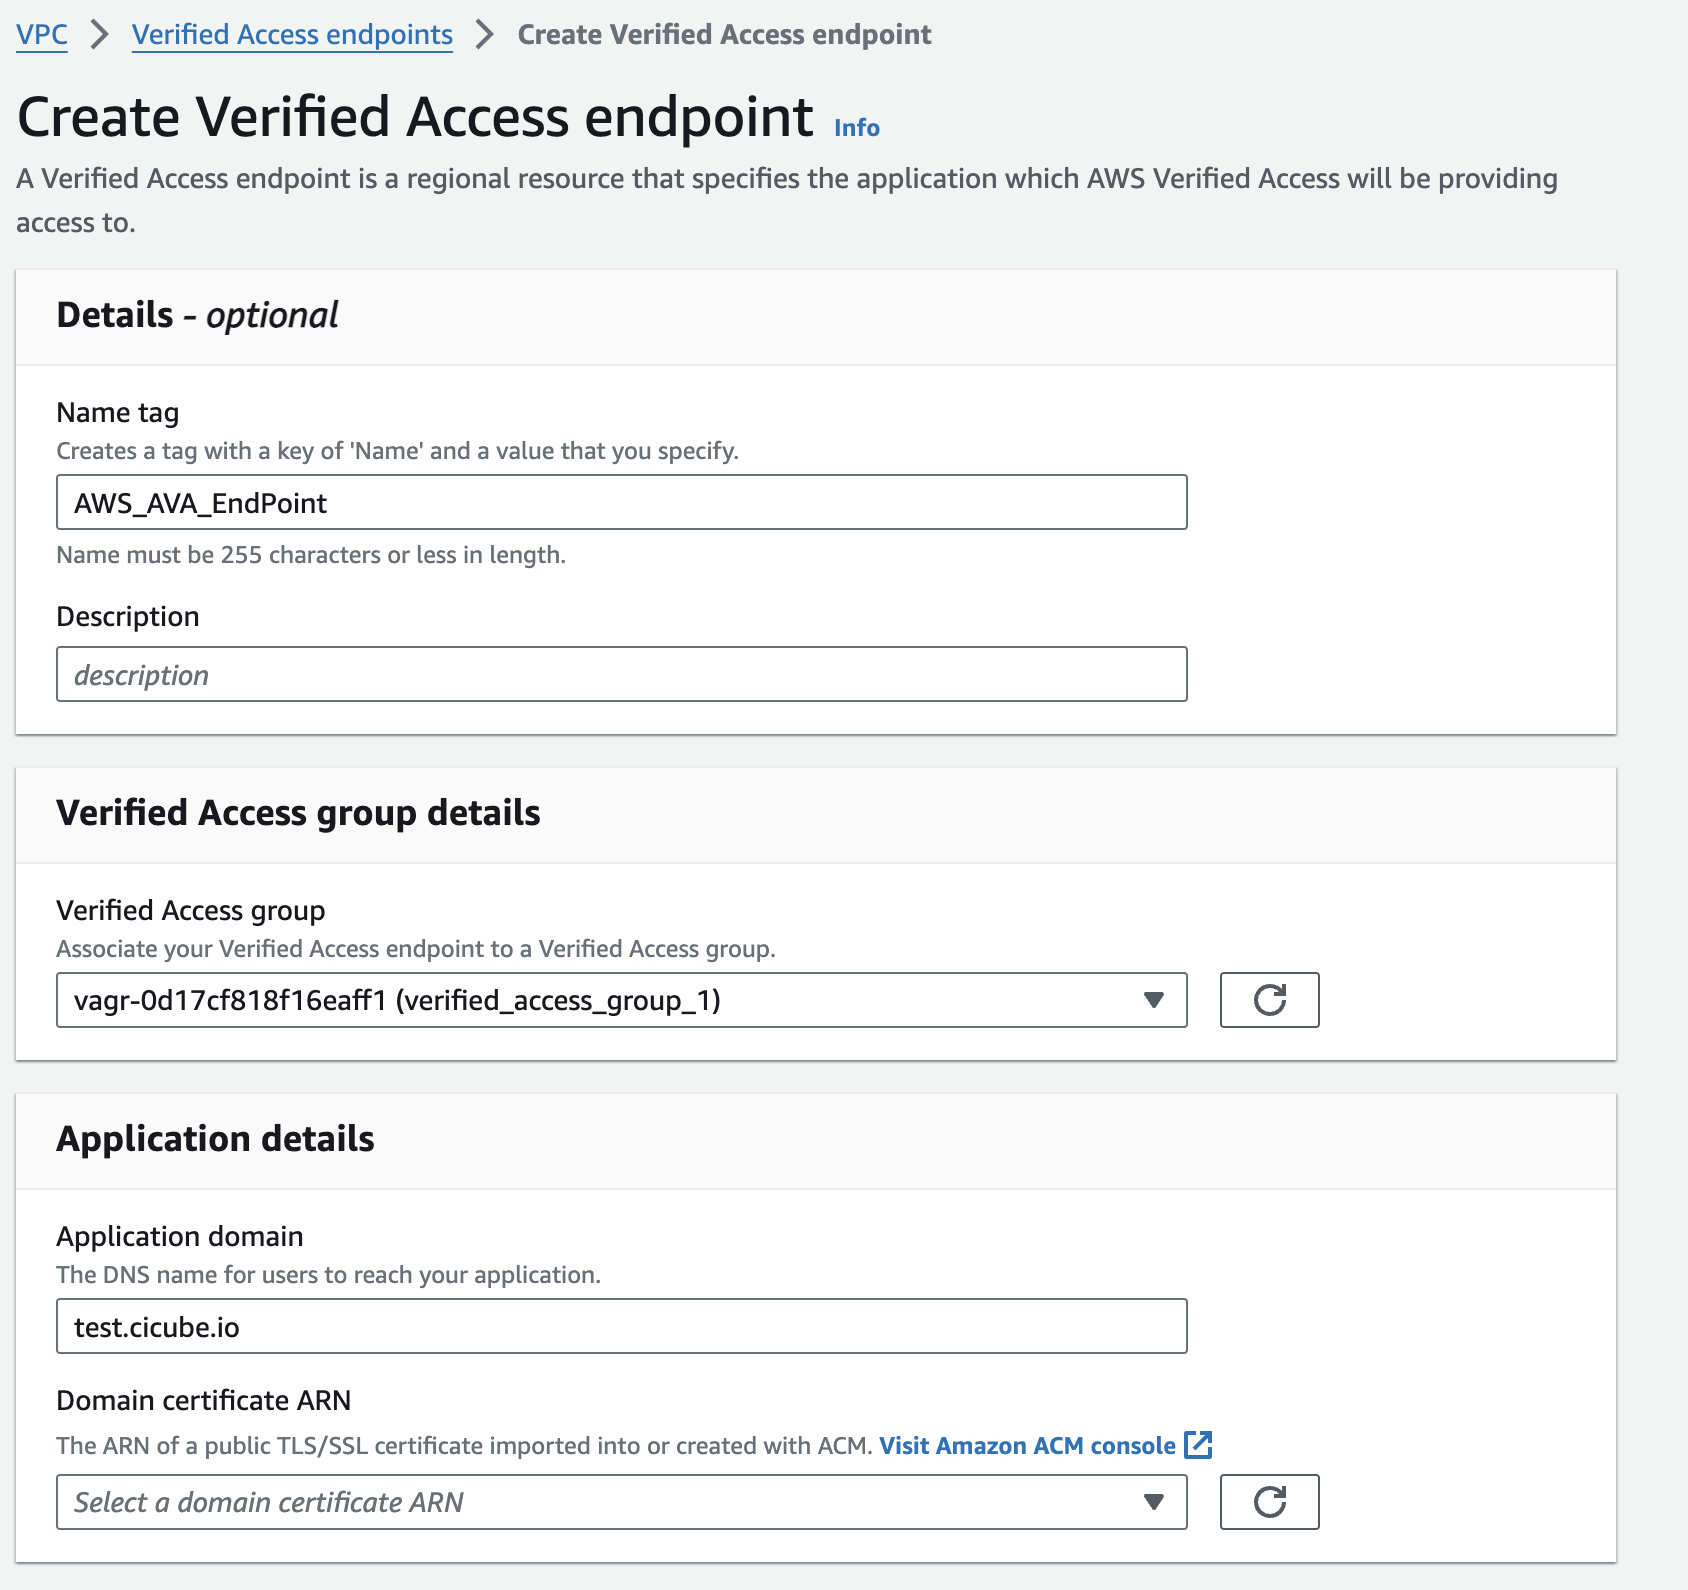
To set up an endpoint, which will have its own DNS name and TLS certificate, follow these steps:
- Choose the Verified Access Group you created before.
- For the Application domain, type in a DNS name for your app. Here, we'll use it.jagdalet.people.aws.dev as an example.
- Select the public TLS certificate you requested earlier for the Domain certificate ARN.
- For Attachment type, pick VPC.
- Choose the security groups for the endpoint under Security-group. These groups will apply to traffic going from the Verified Access Endpoint into your load balancer.
- Type in a custom identifier for the Endpoint domain prefix. This will be added to the start of the DNS name created by Verified Access for the endpoint.
- Set the Endpoint type to Load balancer and select the correct Protocol, Port, Load balancer ARN, and subnets.
An important thing to note about Verified Access is that it doesn't allow the use of wildcard certificates. While this might increase security in theory, it means you have to create a certificate for a specific domain or subdomain
certbot certonly --manual -d xxx.cicube.io
Step 6: Set up a policy
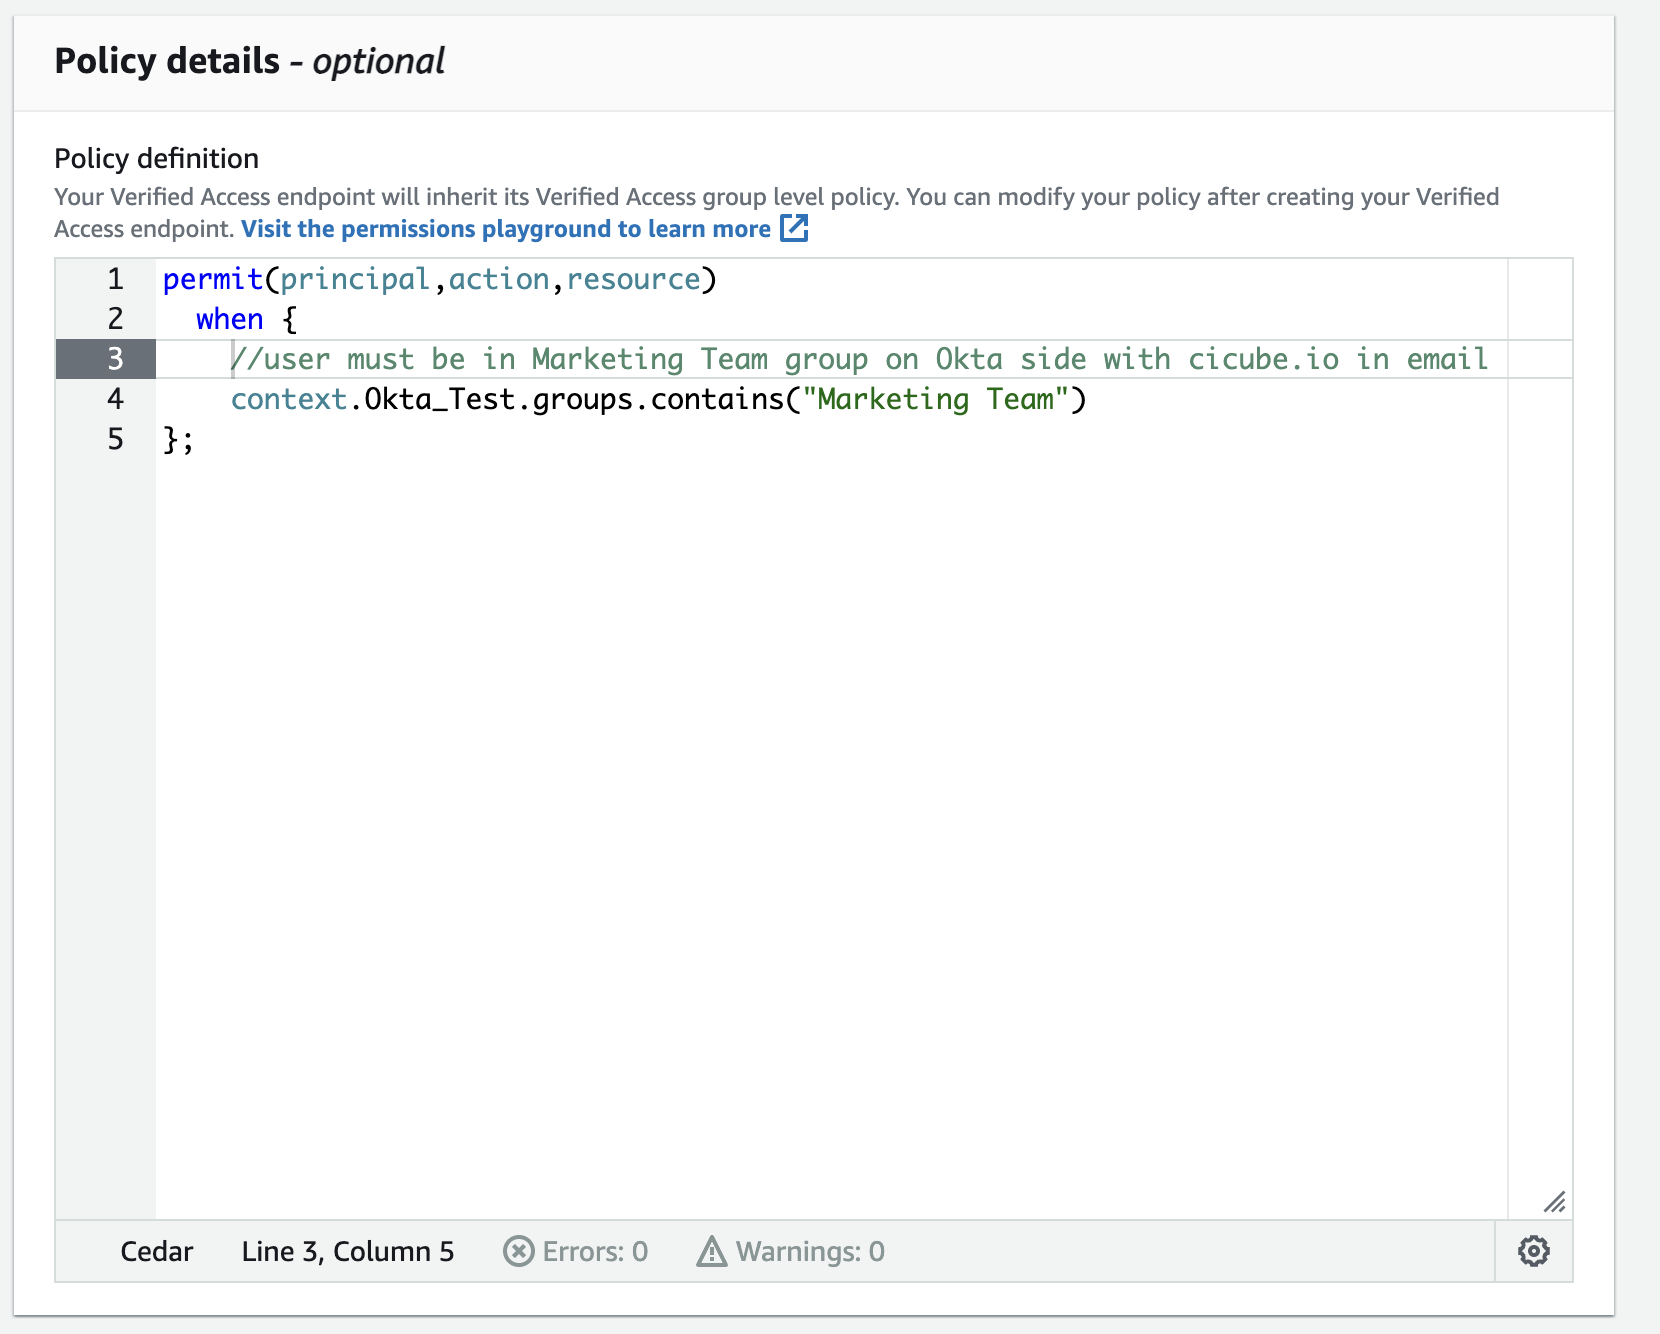
To set up Access policies, you'll use Cedar, which is AWS's policy language. Remember, the name you see after context should match the Policy reference name you chose when creating the Verified Access trust provider. For more details on how to write these policies, including syntax, attributes, and how to use operators, check the documentation page.
Here's an example of a policy that means access to the application is only given if the user belongs to the Marketing Team group.
Scopes let a user decide what information an OIDC client can see about them. This could include things like their profile, email, or phone number, which are kept by an identity provider that follows OIDC standards. To know which scopes you can use, you should look at the Okta documentation.
Here's an example policy that makes sure the user is in the Maerketing Team group, has an email address ending with @cicube.io.
permit(principal,action,resource)
when {
  //user must be in Marketing Team group on Okta side with cicube.io in email
  context.Okta_Test.groups.contains("Marketing Team") &&
  context.Okta_Test.email like "*cicube.io"
};
After you create the Endpoint, in the details section, you will find the public DNS name of the endpoint.
Take the public DNS name of the endpoint and make a CNAME record for your application's domain in an Amazon Route 53 Public Hosted Zone.
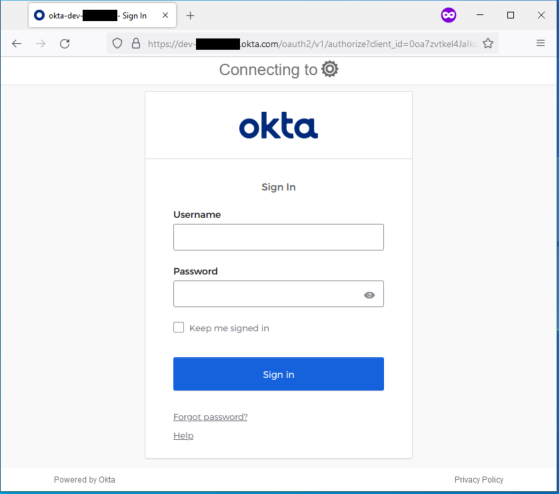
To check if everything is working, open a browser in Incognito mode and go to your application. For this test, log in with a user who is in the Engineering group on Okta. In this example, there's a simple Apache web server set up behind an ALB. When I visited https://test.cicube.io/, it sent me to the Okta login page. After I put in my login details, I was able to get into my application.
Conclusion
In this post, we covered how to integrate AWS Verified Access with Okta as an external Identity Provider (IdP). This setup allows users to securely access corporate applications from anywhere over the internet without needing a VPN. This approach simplifies the experience for both IT administrators and users, all while prioritizing security.